Thursday, May 19, 2011

Tea Anyone?

What a great gift for any tea lover! 
 Yet another GREAT project from PCL (Paper Crafters Library).  This looks very complex but once you do one, you can whip up a few more in no time.  Its that easy!...  Once I assembled the tea bag holder, (See how its done here)  it was time to decorate.  Using my SU 'Time for Tea' set, I cut out the tea pot and gave it a little dazzle with my stickles. 

 I then used my stickles to go around the teabag holder to form a line of dazzle.  To top it off, I created these rose flowers (made of paper).  THESE are sooo easy to do...


I used a circle punch, cut through it, and then started to roll them.  Spritz them with the shimmer and there you have it!  I hope you've enjoyed my project. 

Wednesday, May 18, 2011

Vintage Tin for Mother's Day

WoW…how time flies. Mothers Day has come and gone and we are almost near the middle of the year (June). For my mothers day project I chose a vintage tin.  I had a great deal of fun and excitement when I was making this.  I got the jump start from PCL(Paper Crafters Library ). I used what I had in my craft room but just took the basics to get started. PCL is a great website to get ideas flowing. If you’re ever interested in joining in on creative fun …just click on the Paper Craft Library button above at the top of my blog. It’s loaded with videos and PDF files. There is no obligation to be committed for any period of time, you can cancel at anytime. Now on to the project. I used a Stampin’ Up tin (I believe they still might be on clearance for 2.99). Covered the tin with paper from K&Company. (Life’s journey). (refer to PCL to see how this is done) LOVE THIS PAPER! Really cheap at Michaels. And when you use your coupon…even cheaper! The flower is made by using Tim Holtz tattered florals die cut. Using 2 large, 1 medium, and 1 small flower I lightly mist them with water using my spray mister…crinkled them a little then reformed them. I then sponged them individually with SU Cajan Craze ink and assembled them together with a brad. Believe it or not - I didn’t think ‘orange color’ would go but it went perfect for the accent color that was in the paper. It turned out to be more of a blushy color than a fall looking color. (This is what happens when you get out of your comfort zone and just experiment). The ribbon with pearls are just misc. pieces I had kicking around my room that I bought from HL and the sentiment is from SU set called Well Scripted. The hardware is also from SU. And just to touch it off, I sprayed it with frost shimmer mist to give it just a hint of softness.
Now on to the inside…I used the back side of the paper
and lined the inside of the tin. I thought how nice it would be if she would use it to lay her earrings inside. So, rummaging through some stuff I had laying around, I added a little piece of lacy ribbon inside….so when she lays the earrings down, it would be easier for her to see where she placed them. And it adds a little vintage look to it.
I made her a vintage card to go with her gift.

Using Nestabilities Label 4 I stamped my image (wire dress form from Stampabilities), I then sponged it using Cajan Craze ink. My card base is Old Olive and I incorporated the same paper for the background using the same pearl ribbon to tie it altogether. I topped it off using some pearls on the image just to enhance the vintage look. I again used my Frost Shimmer Mist to top it off.
I hope you’ve enjoyed my project as much as I did. I enjoyed it so much; I’m looking to do some swapping with other vintage lovers out there. So, if you’re interested, contact me and we can set up some kind of swap group for vintage tins.

Thursday, April 28, 2011

I GOT IT !! ...figured out ~ that is.....

Whew!!!  I finally fixed my title post....what a nightmare....If you remember...I was messing around with my fonts and colors....well, thats a ~NO~NO! 

Sometime ago I came across some directions from Kevin and Amanda's website on how to play around with your fonts on your blog with your titles and sidebars. 
Well, their great directions....when you FOLLOW THE DIRECTIONS......(lol)...!!!!   It took me alot of hours to figure out how to fix the big, bold, hot pink, size 50 title that I had.  YIKES!  I only wanted to see if it really worked and so I picked big bold colorful font....and then...I tried to reverse the directions...well it doesn't quite work that way...
What I didn't realize until tonight...is how it actually all tied in together....I was just doing what the directions said to do...not really understanding the WHY behind it... so, after many many failed attempts to fix it ( I read those directions a thousand times!)... The light came on!  Now I get it!!!! 
WoW! - its taken me how long???..yeah, Im blonde.

Sunset Fisherman

Yet another birthday...I know!  My FIL will be turning 70 on Sunday and what better card than this.  He loves to fish. I used an old stamp set from Stampin' Up called "Summer by the Sea".  For those of you who are familiar with the set, you will know that is is not a silouette stamp set - BUT as I was browsing splitcoast stampers for masculine fishing cards...I came across this  particular card .  I had to try this!  This is an actual photo with an amazing sunset from Oneida Lake.  Oneida Lake sunsets are the best ~ Absolutely BREATH TAKING in the summer.  I stamped my image with Black StazOn ink and then used a sharpie marker to fill it in. 
I then used a thin sharpie and a straight edge for my fishing line and then stamped a fish from the set "on the fly".
I would have loved to have a stamp that said 'Papa' because that what my kids call him but I had to used what I had...The sentiment is from Stampin' Up set "let the fun begin"
I hope you enjoyed this post as much as I did.  Go ahead and give this technique a try....I guarantee you'll be printing more pictures!
ENJOY!!

Friday, March 25, 2011

HAPPY BIRTHDAY

Before I begin my post...I have to apologize..... First because I can't figure out how to change BACK to my original font for the titles - Its hot pink and BIG. I put a request into Amanda @ kevinandamanda.com to desperately help me...but I haven't heard back from her, so perhaps I can put another request in. And, secondly, because I have not been posting for awhile. So, enough of that....

Today, I’m sharing a few projects I whipped up. I love making 3-D projects...they are fun and challenging. Taking crafting to a whole new level...you feel a joy of accomplishment when all is said and done.

This cupcake came from a template that I obtained from Paper Crafter's Library.  Take a visit to their website.  What do ya think?  There's whole latta craft there.  I used my red stickles to get a shiny cherry on top.  Then for the sprinkles I used my blue, yellow, green & pink stickles. 
 CAKE BOX
My next project was made from another template (which I'll share with you at the end of this post). Tomorrow is my Aunt's birthday.  My daughter & I whipped this up in one night.  Not bad for a last minute idea.  After all - 4 hands are better than 2.  
 
 I found the template from doing a search on 'free cake box templates'....There are many to choose from. Once I saved it to my computer, I had to adjust the size to my liking.
I had this glass plate laying around in my craft room for a different project that I never got around to doing ~ yet ~

[there's still time...lol] so I decided to put it to use.  After putting the cake on it...I decided to dress it up using Stampin' Up punch called 2-step Bird.  Did ya happen to notice the flame on the candle...yup...its the bird.  This punch is SO UNIVERSAL....
Well, hope you've enjoyed....As promised...here is the template for the cake...
Recipe:
12 sheets of Cardstock (any color)
Ribbon (to wrap around the boxes)
Ribbon for the bow
Embellishments (punches, Quikuts, plate etc..)

Cake Template
Go take a look: Paper Crafter's Library

Tuesday, November 30, 2010

Christmas Past

Oh, its that time of year again....time to start making those christmas cards.  Here is a card I made for a christmas card swap with a few of my friends...I  used  Graphic 45, Deluxe Edition Christmas Past paper ( to die for!!!)   You had to come up with a technique and some layers...so this is what I came up with.  I wanted the viewer to get the 'picture'. 
I used Victorian Greetings as my wallpaper.  I mounted it on a piece of stampin up old olive paper.  I used my Labels 4 nestabilities  to cut out my picture image.  I used the christmas wishes paper. (I was able to get 5 good pictures from one sheet).  Using my metallic gold painter marker, I 'painted' the edge of  the cut out to make it look like an antique picture frame.  I then  used Ultra Thick Embossing powder to make the glass.  I then mounted it onto the Nestabilities oval cutout just so it would break up the image against the wallpaper.  I then used my metallic gold painter marker and 'painted' the edges of my cardstock base and old olive cardstock.  If you don't own a painter marker...you gotta get one!  Its the bomb!  Hope you enjoyed my card.  Happy Holidays...

Sunday, October 31, 2010

Is it to early for Xmas gifts?

ADVENT CALENDAR
hello everyone!  Its hard to believe that xmas is right around the corner.  My mind is already gearing up for presents.  I wanted to make an advent calendar.  In doing research on how to make one...I discovered that I couldn't find one ANYWHERE available on the internet....Really....NOT ONE!! The one I particularly had in mind is made from KaiserCraft...it has ax 10x10 window(frame) in the middle and the 24 boxes around it....click here.  This is a kit that you have to assembly your self and then decorate.  The company is from Austrailia and is sold out in the USA.  If you can find one let me know....
So, I was not giving up....I decided to do make my own.  Went on splitcoast to see what everyone else was doing....checked out the resource page and went to town.   Here's my finished project...
The paper I used was from My Mind's Eye called Wonderful Winter.  I cannot tell you how GEORGEOUS this paper is.  The letters/numbers were cut out by using the original sizzix fun serif dies using Stampin Up cherry cobler.  If you look very closely, there are non traditional colors in this project.  Pinks and blues along with reds and greens.  I never thought I would work with pinks / blues for xmas but it was fun.  The whole project took about a day.  Check out the resource page on splitcoaststampers.com and give it a try.                                             

Monday, October 4, 2010

Fun camping project

hello fellow bloggers....It has been well over a month since my last post.  Thought I would share one of my many projects that I did over the summer.  I made this for my S-I-L birthday.  They love to camp and I thought it would be a great gift for her to keep track of her family camping travels. 

Not really that hard to do at all.  I purchased this journal book at the dollar store..(yes..thats right...Dollar Store!)....took it apart, faced it with my camping scrapbooking kit (purchased at Michaels -using my 40% off coupon - reg.$9.99) and assembled back together.  That easy!  (tip: to repuncture the holes on my paper..I used my friskars hand held hole puncher).  Hope you enjoyed!

Monday, August 23, 2010

SUSHI ANYONE?

I came across these fun little shaker cups at my local stamp store.  Had to try it.  Very easy to do.  I used the SUSHI BOWL PARTY stamp set by STAMPENDOUS along with the SUSHI FAVORITE WORDS set.  I used little crystal microbeads that I obtained in my many travels to the craft stores...didn't have a clue what I was going to do with them...until now.  They look like tiny bubbles inside a bowl...Here's a closer look.  I used my Large circles nestabilites to make the circle..  Now you might ask how I got the beads inside...well it was sort of tricky but I filled the cup, placed the white card stock image over the back...flipped it over..then took the cup off...gathered all the beads in the center...then pealed off the backing of the cup...and carefully placed it back over the image...that way I had control over where to place it...making sure it was centered and everything in the picture was visable.  Fun project card to do...can't wait to do a few more.

Friday, July 9, 2010

Changing my font

Can you stand it? You can do just about anything you put your mind to. I have been dying to play around with the fonts on my blog but SCARED to DEATH I would screw something up. Well AWSOME AMANDA over @ www.kevinandamanda.com has all the answers. That girl knows everything...ok ...well everything I want to know. Whenever I need to find out how to do something...I just hop on over to her blog. She's awsome...ok...enough of the praise..but on to my story.....

I have to tell you that it is a tad bit overwhelming if you don't understand all that HTML stuff but if your good at following directions to the 'T'...then eventually you should have NO PROBLEM doing this. Go ahead .... give it a try...don't be afraid like I was. Now that I know how to do it...I'm off to my next journey.


Sorry... I got carried away.... you may notice that my fonts are HUGE...and the colors...well..they're bright....I did that on purpose so I would know if my (I mean Awsome Amanda's) creation worked or not. ~ VIOLA!~

All I'm saying is - AMANDA - YOU ROCK!!

Tuesday, July 6, 2010

Happy 4th of July

Wednesday, June 23, 2010

HAPPY FATHER'S DAY


HAPPY FATHER'S DAY to the very dear ones that mow my lawn, fix my car, paint my living room etc....without them....what would one do?  I was surfing splitcoast and came across a cool technique.  My original thought was to go purchase some metal plates that you would find at AC Moore's or Michaels...but then I seen some cards that used HEAVY DUTY aluminum foil...thats right...ALUMINUM FOIL.  The key here is HEAVY DUTY.    I used the stampin' up texturz plates to make the 'diamond plate' look of metal tool box. 

I just had to try this QUICK n EASY card.  They call it a 'Z' fold card.  My FIL loves fishing so this was perfect card for him.

LOVE this stamp.  I found it at Hobby Lobby -- yet another great craft store -- you can find just about anything in there.  Our Hobby Lobby is right next door to Lowes - in fact....its attached...so you can send your hubby over there while you shop.  Whoever thought of that was a genious!  I have another stamp like this that say 'graduate'.  I have seen one more like this called 'soldier' but I do not have that... ~ YET ~ :^)

Last but not least..... this card I used a kwik kuts embossing folder.  Not my favorite as you can see it is not a true A-2 size - but it did the job.  I guess it would it be ok if you were to mount it to the base of the card.  I have a few of them.  Love the dog...looking so innocent.

....Blog roll Please......

Hello Everyone...hope today is a glorious day for you!  I wanted to intruduce to you my newest 'sister bloggers' - ~ GLITTER CHIQUES ~.  I have listed their blogs on my sidebar.  I also wanted to share their blog address here.  So if you have a minute...go ahead and take a look at their blogs.

1. http://www.altered-for-him.blogspot.com/

2.  http://www.scrapsoflife.dreamhosters.com/

3. http://fallnpetal.blogspot.com/

4. http://my-little-somethings.blogspot.com/

5. http://jennipherlowery.typepad.com/paper-expressions/

6. http://roseohio-myblog.blogspot.com/

7. http://thetrashqueen.blogspot.com/

8. http://www.doodlethispink.blogspot.com/

9. http://papermavenprojects.blogspot.com/

10. http://stampingwithanangel.blogspot.com/

11. http://jaspere-jaspereslittlecorner.blogspot.com/

Wednesday, June 9, 2010

LIVE IT..LOVE IT...BREATHE IT: MY VERY FIRST BLOG ROLL

LIVE IT..LOVE IT...BREATHE IT: MY VERY FIRST BLOG ROLL:
just thought I'd bump this up...incase any new bloggers come visit. If you never did a blog roll before...try it...its alot of fun. A great way to meet new blogger friends.
Click on the link, it will take you to the blog roll. Click on the link to add your blog and then follow the train. Visit the other blogs, leave a comment mentioning the blog roll and grab their button and add it to your blog. Hopefully, They will return the favor.
Happy Bloggin'

Tuesday, June 8, 2010

My Flower Garden

Come visit my flower garden. New pics added.
 Click on the page above and follow the link...or just click below.


2 new blogs coming......

Hello Everyone!  Just wanted to give you some blog update.  I have been busy creating 2 new blogs - 1. My Flower Garden 2. My Scrapbooking Recipes.  Although they are not completely finish...your more than welcome to take a peak.  As with anything new, it takes time to get those finishing touches in place.   So I will be constantly adding new stuff.  Just click on the above pages ....and follow the link provided or click below.  Happy Blogging :) I would love read your comments about them. 


Sunday, May 30, 2010

LIVE IT..LOVE IT...BREATHE IT: STAMP SET GIVE-A-WAY

LIVE IT..LOVE IT...BREATHE IT: STAMP SET GIVE-A-WAY

AND THE WINNER IS....................(click on the link above to find out)


Wednesday, May 26, 2010

MY VERY FIRST BLOG ROLL

WHAT IS A BLOG ROLL...one might ask?  Well, its It's a linky list that is SHARED between a group of blogs that allow people to "hop" from blog to blog to see whats happening around the blogging world.  So lets get started. 

Here's how it works....
1.  Grab the LIVE IT...LOVE IT...BREATH IT button and add it to your blog / blog list (its the first link on this list)  Leave me a comment when your there and I'll grab your button to add it to my list as well.


2.  Add the blog hop list (instructions are below) to your Button Swap Blog Hop post.  Be sure to include the guidelines so all the buttons you swap with others will be returned by them grabbing yours as well.
     * Be sure to include your button's copy code in your swap post.


3. Link your blog post up to the blog hop. (you only need to do this once and its will show up on all the hop list on all the blogs participating)


4.  Then start visiting other participants!  Grab their button and add it to your blog sidebar or blog roll.  Don't forget to leave them  a comment telling them about you visiting the blog hop party.  Be sure to return the favor to anyone visiting you.


5.  Don't wait for them...go get them!  HAVE FUN & HOPPY BOGGING.


(guidelines provided by blogger chic designs)

Saturday, May 22, 2010

STAMP SET GIVE-A-WAY


AND THE WINNER IS........................
 ~ JAN in ID ~
C-O-N-G-R-A-T!   Thank you to everyone who signup to follow my blog.  Every now and then I will be giving away some more.  So spread the word....you never know what I'll have to give away.  
  So, JAN in ID...you have 24hrs (12:15am May 30th, 2010) to get send me an email via my blog so I can get you your brand new stamp set sent to you. 


OK.... for all those stampers out there.....today I am going to play all day.  Split Coast Stampers (SCS) is holding a convention here in Syracuse.  With that said....I'm giving away this stamp set from STAMPIN UP.  The name of the set is WHIMSICAL WORDS.  
Wanna Win?  All you have to do is sign up to follow my blog and leave me a comment about what you think about my blog.   I will pick a random number from the people who sign up to follow me and announce the winner one week from today....MAY   29th...
REMEMBER in order to win, you have to sign up to follow me, just leaving a comment doesn't qualify but welcoming. 
I'm off to play....so enjoy your day!!

DON'T FORGET....YOU MUST SIGN UP TO FOLLOW MY BLOG....in order to be in the random drawing for the free stamp set.  Click on over to the side bar .. look for  'follows' and sign up....

Friday, May 21, 2010

Girls Nite Out....

Good times before we stamp the next day away..

SPLIT COAST CONVENTION - HERE WE COME !!

Finally, a convention I can afford to go to.  It won't get any closer than this....Tomorrow 5 of us girls ( ok - tonight...we're starting early) are meeting up and staying in Syracuse to get ready for a stamping day.  One of the requirments was to make your own name tag...so here it is.... 


what do ya think?  Its country looking right?  Thats my style.  Leave me a comment to tell me what you think.
Here are 2 more name tags from the girls...the other 2 I'll have to get tonight when I meet up with them....
This is Nikki's (aka: KAREN).  She doesn't think its all that grand but I LOVE IT!!  Visit her SCS gallery.  She has some pretty nice cards posted there.  Next is Lorraine's tag...aka: LEMON LORRAINE.....

ok...don't be jealous girls....I was playing around in PSE 6 and discovered the cookie cutter tool. So thats why LEMON's name tag is all decked out in style... Im stilling learning the simple things...but loving the software.  I get so tickled over the little things... *smile*.  OK - did I mention how your suppose to keep it attached to your shirt?  Well I was wondering the same...so being creative as I like to think I am...this is what I came up with...


 I used my creative mind (yeah right) and sewed a saftey pin to a piece of scrap paper and then on the other side I used some huge dimensionals with some major thicknessDid I mention how I hand sewn the stitching...and then almost to the end...the needle broke...go figure...

Hope you enjoyed my blabbing....stay tune...I'll post the other 2 pics when I get them.....Don't forget to leave me a comment to tell me what you think about them....

 5-23-10 UPDATE:  AS PROMISED...here are the other 2 name tags..


How cute are these?  Just loving them!  There were some really creative name tags.  Lots of ideas for next time.  I couldn't use the 'cookie cutter' tool in PSE 6 on Kelly's because of the way I snapped the picture...but for Amy's...her's was easy becuase it was square.  The shape almost matches her badge..

Yet another Birthday

On May 3rd yet another friend turned 40.   She lives in Louisiana so I had to wait to post pic of her card so she wouldn't see it before she got it in the mail.  I hope by now she has it....


 Did ya happen to notice the little boot is kicked over?  Heres a close up.  I got this idea from my friend Nikki (aka: KAREN) [....long story].  She made a card with this stamp set and I absolutely loved it...so I kinda borrowed her idea...
 

Any hoot....here's the inside of her card...

 
I hope she has a marvelous year!   HAPPY BIRTHDAY JEN!!
 

Thursday, May 20, 2010

FACE LIFT....

Ok, so I've had a few dozen facelifts on my blog.....Its sort of like moving your furniture around in your living room......until it looks right.....just gotta keep moving it around.  Then VIOLA.....it looks good for a week..or so...and then time for a change.  On a serious note...I have been searching for a 'crafty' look...buttons, lots of embellisments (something related) and found nothing.  So after endless searching... I came across shabbyblogs.com.  There are tons of stuff there for FREE...(did I mention FREE)...that match...its like going to the store to buy an outfit...and when your at the check out counter...you just gotta have those earrings near the register...oh, and don't forget...the shoes....and why not just buy the purse that matches the color in the button on the dress......ladies - you know EXACTLY what Im talking about.....  so, if you become a follower of mine...don't be surprised from time to time to see something different on my blog.....word has it though...once your settled in...if you change the blog background / settings...it may not look right on your older posts......guess I'll have to learn the hard way.  But until then...if I don't discover something out there close to what Im really looking for...then this is it....I LIKE IT!

New Signature

signatureWell, I finally created my new signature.  Not to bad for not knowing much....just a lot of frustrated nights playing with my Photoshop Elements 6.  Didn't have a clue how to use it...but figured things out by tutorials.  And I still don't know what all those buttons are for.....So, my very first...from scratch design...looks a little big....but I've made it this far...and I can't go back...cause it would take me 3 hrs to do it all over again (*smile*)

Monday, May 17, 2010

BLOG HOP # 3

Ok, Im going to attempt my first ever blog hop.  I thought it would be fun to hop around to see what other crafting blogs have to offer ..... so here it its....


Leave me a comment so I can hop on over to your blog.


Here is my button....grab it and pass it along.

LIVE IT…LOVE IT…BREATH IT


Here are the guidelines for playing...
Guidelines:


1. Grab the Blogger Chix Designs button and put it on your blog/blog roll (first link on the list). Leave them a comment while you're there. Don't forget to leave myself a comment (LOVE IT...LIVE IT...BREATH IT and I'll grab your button and add it to my blog roll too!


2. Add the blog hop list (instructions below list) to your Button Swap Blog Hop post on your blog. Be sure to include the guidelines so all the buttons you swap with others will be returned by them grabbing yours as well. *Be sure to include your button's copy code in you Swap Post.


3. Link your blog post up to the blog hop. (You only need to link up once and it will show up on all the hop lists on all the blogs participating).


4. Then start visiting the other participants! Grab their button and add it to your blog sidebar or blog roll, and leave them a comment telling them your visiting from the BSBH party! Be sure to return the favor to anyone visiting you.


*Tip for having lots of buttons swap success - don't wait for others to come to you, go to them first!*


Saturday, May 15, 2010

How Sweet it is....


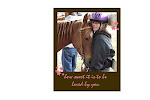
Ok, from time to time, I might post something unrelated to crafting....but hey.....My daughter barrel races horses.  I caught on camera a precious moment....Sandy & her snuggling...PRICELESS!

Friday, May 14, 2010

HAPPY BIRTHDAY

Today is one of my friends birthday.  She likes tea so this is what I made for her.  I was inspired by this card (click here) . The Tea Cup, saucer & handle were all punched out by stampin' Up punches.                                           HAPPY BIRTHDAY AMY.


 I used some Stampin' Up Crystal Effects on my flowers to give it a 3-D glossy look. 

Related Posts with Thumbnails

PAPER CRAFT LIBRARY (PLC)